Blueberry Pocky

What a find!  Pocky is a childhood treat from Japan.  The original flavor came in milk chocolate and that's what I grew up with.  Ezaki Glico produced the first Pocky sticks in Japan back in 1966 and they are popular in other Asian countires.

In the U.S., they are easily found throughout the Asian grocery stores.  I just found out that Pocky is sold under the name of Mikado in France since 1982.  I had no idea, and here I am in Paris running to the Asian grocery store on rue St. Anne paying twice as much for it when I could have just picked up a box from the local supermarket around the corner.  The only thing is that they are limited in flavors.  I have only seen Mikado in milk chocolate, dark chocolate, and chocolate with almond coating.

Pocky has since evolved from just offering milk chocolate, milk chocolate with almond coating, strawberry, and dark chocolate as flavors.  Now it offers chocolate banana, cookies and cream, matcha, sweet milk, melon (cantoloupe), mango, etc...just to name a few.  Blueberry is my most recent find.  What a great treat and fun snack!


Onigiri, Japanese rice balls packed full of wholesomeness.

There was one year during my elementary school years where I brought a bento box lunch as opposed to a brown bag lunch.  I say one year because I went to about 4 or 5 different elementary schools and for some particular reason I really remember lunch time at only one particular elementary school. 

This was the year my uncle, Iichigawa-san from Japan, came to stay with us.  He would make me rice balls stuffed with umeboshi, a Japanese pickled salt plum (my favorite) or fill them with pieces of salmon or ikura (salmon roe) for my bento lunch.  Sometimes they were round like a ball and sometimes they were shaped into triangles. Sometimes they were wrapped with nori (seaweed) and other times just sprinkled with furikake, mixed savory sprinkles.

This is when I had my Molly Ringwald moment from The Breakfast Club  "sushi lunch scene"—so if you can imagine what the kids' reactions were towards sushi in the 80's...I clearly wasn't the most envied one while chomping down into my black seaweed covered rice balls.

Seaweed is a health food and sushi has gone global.  I now make this with flavored rice, experimenting with different grains, beans, and seeds and adding shredded vegetables into the mix.   It's practical for picnics and makes a great snack.  Create your own onigiri according to your own tastebuds!

Onigiri (Japanese Rice Balls)

INGREDIENTS//Yields 4

• 2 cups Japanese short grain rice
• 1/2 cup roasted buckwheat groats (kasha)
• 1/2 cup adzuki bean flakes
•  1 small avocado
• 2 sheets of Korean style roasted seaweed
•  yukari (dried shiso leaf powder)
•  sesame seeds
• 1 tablespoon amaranth seed, popped


INSTRUCTIONS

In your removable rice cooker pot add the rice and rinse with water using your hands to swish the rice and water around.  The water will be cloudy.  RInse until it gets less cloudy.

Add the buckwheat and adzuki beans, and fill the pot with water to the point where indicated for 3 cups of water—I usually add 1/4-1/2 cup water more.

Place it back in your rice cooker and select the mode for cooking rice.

When cooked, using your rice spatula genlty flip through the rice to fluff it up a bit.

Let the rice cool down before handling.

If using a onigiri triangle mold, wet it beforehand so that the rice does not stick to it (remember to do it before each one).

Simply fill the mold with rice just below the halfway point and create a dent in the middle.

Scoop out a quarter of the avocado and place it in the middle.  Be careful not to overstuff.

Fill the top half with the rice mixture press down with the lid onto the rice.

Take the lid off, flip over the mold, and press down on the flexible backside to push out the rice.

You can also use your hands to mold the rice into balls or triangles: Keep your hands wet, spread the rice out on the palms of your hands, place the fillings in the center, fold up the rice around it, pack it tightly with your hands, and form it into the shape you like. 

Sprinkle it with some sesame seeds and/or yukari (adds a tangy and slightly salty taste), and popped amaranth seeds.

Cut your Korean roasted seaweed in half lengthwise, place the rice triangle in the middle and fold up the sides of the seaweed pressing the seaweed into the rice so that it sticks.  Bend the top flaps of the seaweed down along the sides of the triangle so that the rice triangle is entirely wrapped.


NOTE

I use Korean or Japanese seaweed.  Korean seaweed is more flavorful because it is roasted with oil and salt.  Check the ingredients list making sure it is short and not added with additional salt, sugar or artificial ingredients.

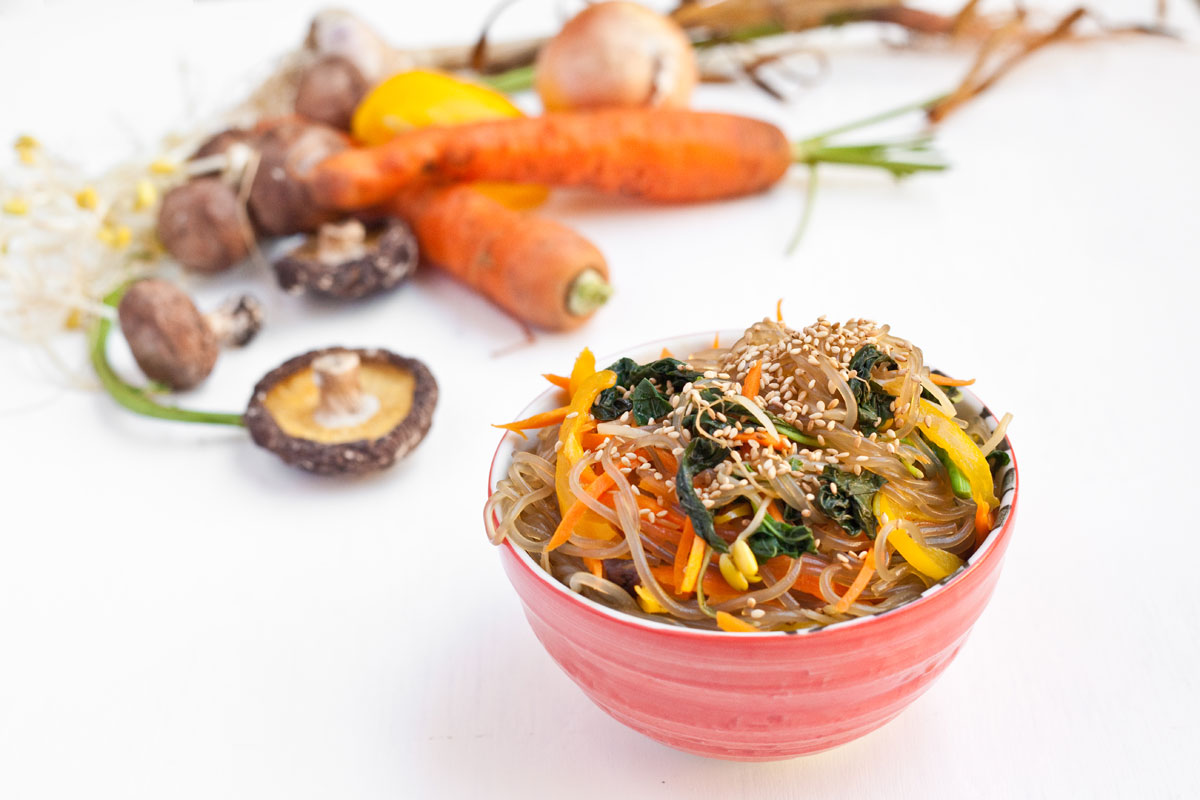
Japchae (Korean Sweet Potato Noodles with Veggies)

Japchae1Resize.jpg

My days in Koreatown in Manhattan and in Flushing, Queens are long gone.  Paris has its share of Korean restaurants but I can't say it compares to the plethora of choices given on a one block radius of Manhattan.  And this one block radius is just a tiny representation of the many blocks of which Korea Way stretches along, 5th Ave through to Broadway on W32 streets.   Apparently, it is paving its way in the other direction too— towards Madison. 

My penchant for discovering new ingredients or different ways to cook them up stems back to my youth: influenced by my parents, who love to eat, cook and dine out;  feeding my soul and stomach through my travels; and eating my way through NYC during my college years—lots of interesting 24/7 eateries to be discovered in the wee morning for after hours clubbing.  One of those stomach refuelling pit stops was at a Korean restaurant called Kang Suh.  Ahh, those were the days...

Fortunately, I have good Korean friends who can cook.  They have educated me and shared their recipes throughout the years.  Now I can whip up the Korean basics and just re-create the past.
 

Japchae (Korean Sweet Potato Noodles with Vegetables)

INGREDIENTS//Serves 4

• 200 grams (7 ounces) dangmyeon (Korean sweet potato noodles)
• 1 small onion, sliced thinly
• 1 carrot, julienned
• 1 pepper (red, yellow, or orange), sliced thinly
• 3-4 shiitake mushrooms, dried or 100 grams small white "button" mushrooms (aka champignon de Paris in France), sliced thinly
• 100 grams of bean sprouts
• 100 grams fresh spinach
• 1-2 cloves garlic, minced
• 1 egg, whole (optional, opt-out if going the vegan route)
• 1-2 tablespoons sesame seeds

Sauce
• 4 tablespoons soy sauce or tamari (gluten-free option)
• 1 1/2 tablespoon honey or 1 tablespoon brown sugar (vegan option)
• 1 tablespoon sesame oil
• 1/2 teaspoon black pepper

PREPARTION

If using dried shiitake mushrooms, you need to soak them at least a few hours (I soak them in the morning for evening use) in advance in room temperature water.  Put them in a bowl of water and swish them around with the stem side down.  Once they are plumped up and soft, give them a squeeze and set them aside for later use.

Slice and julienne all your vegetables: the mandoline comes in handy.

For the egg topping, seperate your egg yolk and white.  Fry them up seperately in a pan and then slice it up into matchstick pieces. 

INSTRUCTIONS

Prepare your sauce and rinse all your vegetables.

Bring a large pot of water to boil and then add your dangmyeon.  Follow the instuctions on the back for the time.  It's usually around 5-7 minutes.

During this time, marinate your mushrooms in one tablespoon of the prepared sauce.

Transfer the cooked noodles to a colander and rinse under cold water, drain, and put them in a large mixing bowl.

Rinse out your pot, add water and bring it to a boil in order to blanche your spinach and your bean sprouts at the same time.  Basically you want to boil your spinach and your bean sprouts for a short amount of time (1-2 minutes), then quickly rinse it under cold water. 

In a seperate bowl, add the minced garlic and sea salt.  Squeeze out the remaining water from the spinach and the bean sprouts and rub it into the garlic and sea salt.  Let it sit.

In a single medium size pan, add some cooking oil to stir fry your vegetables seperately in this order: onion, pepper, carrot, and mushrooms. 

Transfer each ingredient after it's cooked to a bowl set aside.  The vegetables should not be cooked until limp.  It's nice when they keep their color and still have a slight crunch to them.  So keep the cook time short.

Add the prepared sauce into the mixing bowl with the noodles and stir in all your cooked ingredients. 

Garnish with lots of sesame seeds and your egg toppings (optional).


NOTE

I picked up an organic basket of veggies this week and I had a stalk of amaranth included in it.  I have only purchased the grains in the past so I didn't even know what the plant resembled.   It had some leafy greens on it, so I plucked them off and used it in place of the spinach.   It was a great substitution.

You can also add beef to this dish: slice up your beef, marinate it with prepared sauce in the same bowl with the mushrooms, and stir fry it together.

This is a dish that can be eaten cold, at room temperature, or hot.  If you want it hot, simply place all the ingredients back into the pan to heat up before serving.


It's not Bastille Day, it's le quatorze juillet, la Fête Nationale.

I just discovered that Bastille Day is a British term and that's what I always referred to it as when growing up in New York.  In New York, there were annual street fairs celebrating Bastille day with French food and wine.  Even contests were set up so that one could win a roundtrip airfare to Paris and back.  

Living in the know and now in France, we simply refer to it as le quatorze juillet and it is formally called la fête nationale.  Festivities start with the Fireman's Ball in various fire stations across Paris on the eve, then a morning military parade on the Avenue des Champs Elysées, and closes with an evening fireworks display from the Eiffel Tower. 

History in a nutshell:  Mutinous minds were brewing a few years earlier leading up to the start of the French Revolution which began with the storming of the Bastille prison on July 14, 1789.  Living in a feudal aristocratic system with the philosophes of Enlightenment, a weak monarchy, and with escalating food and taxe prices—let's just say that some people were not happy.  

The Bastille prison symbolized the arbritrary use of power of the French monarchy.  It's where upper-class and political prisoners of French society were held, unopen to trial, and only under the king's orders.  Thus, attacking it signified the start of a revolution which led towards years of violence and bloodshed—although not so much on that particular day.

Excactly one year after the storming of the Bastille, the Fête de la Fédération was inaugurated on July 14, 1790 to celebrate the unity of France, symbolizing peace.  July 14th commemorates the storming of the Bastille and the Fête de la Fédération.

Here's a taste of symbolism for you pictured below...

Grilled Magret de Canard

Grilled Magret de Canard

And if you keep scrolling down to the bottom, I leave you with Serge's scandalous version of La Marseillaise, the French national anthem. 

Vive la France!  Vice la République!

 Grilled Magret de Canard

INGREDIENTS//Serves 2-3

• 1 farm-raised magret de canard (this particular piece weighed 394 grams, vacuum-packed)
 

INSTRUCTIONS

Pre-heat your oven to 220° C. 

Lay your naked duck breast with skin facing up.  Score the skin of the duck in squares without cutting into the flesh. 

Pop the duck into the over with the skin fat face up for 15 minutes. 

After 15 minutes, flip the duck over and then lower the temperature to 180°C and let it cook for 10 minutes. Take it out of the over and and cut into slices. 

Serve it along with some roasted potatoes and garlicky green beans.

NOTE

I'm a pesco-vegetarian with lots of taste testers amongst me.  Apparently this gets a thumbs up with my carnivorous family.  You can't screw this recipe up, just throw it in the oven!
 

What is kaeshi?

Kaeshi

Kaeshi

This recipe goes hand in hand with my previous posts regarding the dashi stock recipes.  Kaeshi is the essence of Japanese flavoring base to noodles soups and dipping sauce and can easily be used in many other dishes.  My kids eat an entire broccoli head when I cook it in boiling water with a touch of kaeshi.  This can be found in my fridge during the summer months mainly for my cold summer noodle dishes. 

Mix one part kaeshi and dilute it with one part dashi (or more according to your taste) and you'll have yourself a homemade tsuyu sauce without MSG and with a vegetarian option (using the vegetarian dashi recipe). 

Kaeshi (Japanese Noodle Sauce Base)
 

INGREDIENTS//Yields 500 ml

•  2 cups soy sauce or tamari
•  1/2 cup honmirin
•  1/2 cup sugar
 

INSTRUCTIONS

Add the honmirin to the sauce pan and bring it to a boil.  Then turn down the heat to a low simmer to evaporate the alcohol.

Add the sugar and stir it around until melted.

Then add the soy sauce and bring up the heat (do not reach boiling point), stirring from time to time.

Once you see it begin to bubble, turn off the heat and let it cool.

Transfer it into a glass container and store it in the refigerator.

You can make a large batch of this sauce and store it in an airtight container for up to 3 months.


NOTE

Honmirin ("real mirin") is one of three types of mirin that you can easily find in the Japanese stores.  It is a rice wine much like sake and is used for cooking.  It contains the highest amount of alcohol of the three types.  You can use the other mirins to make kaeshi as well.


Katsuobushi Dashi

Ingredients for katsuobushi dashi stock.

Ingredients for katsuobushi dashi stock.

This is a follow up on my vegetarian dashi recipe as most of the time dashi stock in Japanese cuisine is a blend of katsuobushi and kombu.  As mentioned in my previous post, you can have a variation between dried kelp (kombu), dried bonito flakes (katsuobushi), dried shiitake mushrooms and small dried fish for dashi. 

Katsuobushi is a Japanese dried, fermented, smoked skipjack tuna.  Back in the day, a block of katsuoboshi would be kept at hand and when needed; they would simply shave off what was needed on a wood plane.  If you are a die-hard traditionalist you can still purchase blocks of this tuna and make shavings for yourself at home.  Not only is it used for stock, it can be added to enhance flavors as a seasoning, topping, and stuffing.  It also has an aesthetic effect when placed on hot foods; the thin shavings start to move and and shrivel down.

Katsuobushi Dashi Stock

Katsuobushi Dashi Stock

Katsuobushi is easily found in the Japanese and health food stores and its flakes are usually sold packaged in a transparent sealed bag.  It's also rich in umami flavors especially when combined with kombu in this stock.

Katsuobushi Dashi

INGREDIENTS//Yields approx. 1 liter

•  1 liter water
•  1 piece kombu (about 12- inches long)
• 10-15 grams katsuobushi

PREPARATION
In a bowl, steep your kombu in a litre of water overnight or at least 15-30 minutes beforehand.

INSTRUCTIONS

Fill a large pot with the llitre of water and the steeped kombu.

Bring it to a simmer and just before it comes to a boil, fish out the kombu.
 
At boiling point, quickly add the katsuobushi and turn off the heat.

Let it sit for 10 minutes or until the katsuobushi sinks to the bottom.

Strain the stock for use right away or let it cool and pour it in a container, seal tightly, and then refigerate for another time (holds up to 3-4 days).


NOTE

Such as the Kombu dashi stock recipe, the ingredients can be re-used right away to make a second stock referred to as niban dashi.  The first stock is usually stronger in flavor and is referred to as ichiban dashi.


Summer Soba Noodles

Green tea soba with seasonal vegetables and shredded nori.

Green tea soba with seasonal vegetables and shredded nori.

Alas, summer is here.  I wouldn't have guessed it, and neither would you if you had seen me recently walking around town with a light sweater, sleeveless-down vest and a scarf on—oh, and an umbrella to boot.  It wasn't until I got into the elevator when my neighbor greeted me and reminded me that summer has arrived, and then it began to dawn on me.

Peppy and eager, even through the thick of rain and gray clouds—ahh, but summer is here—to share my summer lovin' soba noodle dish with my family and friends, I bought some green tea soba noodles (photos above) and the typical buckwheat noodles (photos below) to add some fun for the kids. 

Soba Noodles with tofu strips

Soba Noodles with tofu strips

You can add your choice of vegetables and protein to make it your own perfect summer dish.  Alas, the sun is shining—for summer is here. 

いただきます! 

Itadakimasu!

Summer Soba Noodles

INGREDIENTS//Serves 4

•  400 grams soba noodles
•  1/2 red pepper, raw and sliced finely
•  1/2 orange pepper, raw and julienned
•  2 zucchini, raw and julienned entire length (think zoodles!)
• 200 grams tofu strips
• 2 scallions, finely sliced

Homemade tsuyu sauce

• 1/2 cup kaeshi
• 3/4 cup dashi

PREPARATION

Rinse and wash well your pepper, zucchini, and scallions.

Cut your pepper in half and rinse out the seeds.  Use a mandoline with just the blade (no teeth), slice finely your pepper.  Place it in a bowl and set it aside.

Peel alternating slices of the zucchini skin off to give it some texture and color.  Run it along a mandoline using the blade with the fine teeth blade lengthwise until you reach the seeds, then turn it and repeat.  Discard the seeds. Place it in a bowl and set it aside.

Slice your scallion.  Place it in a bowl and set it aside.

Sauce: Mix the two parts together and set it aside.

INSTRUCTIONS

Fill a large pot of water and bring it to boil.

Add the soba noodles following the instructions on the back of the package for cooking time.

Drain your noodles in a colander.  Transfer it back into the pot with running cold water.  Press the noodles down with your hand if they start coming up over the pot.  Use your hands to separate the noodles and aid the rinsing process to wash away the starch.  Drain the noodles again.  Begin to separate and place them in the four serving bowls.

Add a handful of zoodles, peppers, and tofu strips.  

Mix in your sauce and top it off with some scallion and sesame seeds.

NOTE

Tsuyu sauce can be found in most Asian stores.  It is usually sold concentrated.  Dilute it with water, just enough to keep its flavor but not so much that it tastes watered down.


Vegetarian Homemade Dashi

Steeped Kombu

Steeped Kombu

Dashi is the base of many Japanese dishes.  Found in many noodle soup bases and dips; one of my favorite Japanese noodle dish is zaru soba, the cold buckwheat noodles dipped into tsuyu sauce—such a hot-weather treat.  I've learned to make my own dashi over the years recalling how my mum did it when I was a kid.  Mostly, I remember eating the kombu (dried kelp) after it was pulled out of the stock and laid aside.  Maybe it was intended for the trash bin but it always ended up in my stomach.  I've always loved the taste of the sea and maybe that's where it began...in the kitchen.

Kombu Dashi Stock

Kombu Dashi Stock

This is a great vegetarian stock.  It is a light broth that is rich in glutamates, thus producing more umami (pleasant savory taste) flavors.  If you buy the packaged dashi which sells in powdered or granule form, and also packaged like tea sachets, they usually contain MSG.   So if you are allergic to MSG or just wince at the acronyms, you can whip it up at home naturally in large stock and freeze it for future use.   Just so you know MSG is synthesized to replicate the naturally occurring glutamates in kombu, so it's a synthesized flavor enhancer. 

 Kombu, dried bonito flakes, dried shiitake mushrooms, and small dried fish are other elements to making dashi.  The kombu used alone is the most basic dashi and a great vegetarian option.  Stay tuned for the next post on how to make katsuobushi dashi which is a fish-based dashi.

Homemade Dashi
 

INGREDIENTS//Yields approx. 1 liter

•  1 piece kombu (about 12 inches long)
•  1/2 liter water

PREPARATION

In a medium size glass mixing bowl, steep your kombu in the water and put it in the fridge overnight.  You can cut it down to fit your bowl.

INSTRUCTIONS

Take your bowl of steeped kombu and transfer it into a medium size pot along with the water.

On medium heat, simmer the kombu until boiling point.

Quickly fish out the kombu (set it aside for a second stock) and turn down the heat.

Turn off the heat and let it cool down.

Refigerate the stock in a tightly sealed container for use up to four days to a week. 

NOTE

The kombu can be used again (right away) after the first stock to make a second stock referred to as niban dashi.  The first stock is called ichiban dashi.


Roasted Baby Artichoke With Parmesan

Roasted Baby Artichoke With Parmesan

INGREDIENTS//Serves 2

• 6 fresh baby artichokes
• 1 lemon
• 1 tsp crushed garlic
• 2 tbsp olive oil
• 30g grated parmesan

INSTRUCTIONS

Prepare a bowl of water and lemon juice on the side enough to hold the baby artichokes. 

Cut off the spiky top bit of the baby artichoke and part of the stem.  Make sure to remove bottom and outer leaves and to leave a bit at the base.  The best thing about the baby artichoke is that you can eat everything inside—yes, even the choke as opposed to the ones in large artichokes. 

Cut each artichoke in half lengthwise and toss in the water lemon juice mixture.  This keeps the color of the artichoke from turning brown quickly. 

Drain the baby artichokes and put them in a steamer for about 15 minutes.  This gets them soft and tender.   Stab a fork in to do a quick check.

Take them out and place the steamed baby artichokes in a bowl, adding the olive oil, crushed garlic, some salt, pepper and lemon juice. 

Toss it all together and then place them on a baking sheet cut side up . 

Sprinkle some parmesan cheese on the baby artichokes and pop them in the oven at 210°C for about 10-15 minutes or until golden brown.  Thisgives them that slight crispness.

Five Veggie Soup

Walking home one day with another mother after picking up my kids from school, thoughts of dinner started to arise.  When I asked her what she was making, she told me: something very simple, vegetable soup.  I am a big fan of vegetable soups and a big fan of simplicty so I asked her how she made hers, and it's true, it is so simple and so healthy that the most complicated part was to remember the list of the five veggies.  After that, you just throw it all in a pot and toss in a bay leaf if you want.  Great thing is that you've got five different veggies in it and you can add more or less of one or another to achieve a slightly different variation in its taste, texture, and color; my kids think they are getting a different soup when they see that it's green.

FIVE VEGGIE SOUP

INGREDIENTS//Serves 4

• 3 zucchinis, chopped
• 2 carrots, chopped
• 1 leek, chopped
• 2 celery stalks, chopped
• 2 potatoes, medium size and chopped
• 1 bay leaf (optional)
• Salt (adjusted to taste)
• 3.5 cups water
INSTRUCTIONS

In a large pot, add 3.5 cups of water (or about 1 litre for a thinner soup consistency) and the potatoes. 

Bring it to a boil and then add the rest of the ingredients.

Cover the pot and simmer on low-medium heat until the vegetables soften. 

Let it cool and then pour it into a blender to liquify. 

If you need to re-heat the soup pour it back into the pot and re-heat on low heat.

NOTE

I added more carrots this particular time so the soup is more orange in color. 
To adjust the consistency of your soup, you can first add all the vegetables into the blender, and liquify it by gradually adding the amount of liquid left in your pot until you achieve the consistency you like.


Kohlrabi Nori Omelette

Kohlrabi.jpg

It's been so rainy, dreary, and cold in Paris.  Thankfully these vibrant veggies vitalize my mind and body.  Can you spot the kohlrabi?  It's the round, stout bulb with the longs stems protruding out of it.

I tasted kohlrabi only a few years ago at a German friend's home.  We got home from a very hot and exhausting day at the park with the kids full of dirt, hunger and thirst.  She quickly dropped all her things, washed her hands and grabbed an odd-looking vegetable from her countertop that I had seen in markets before but never knew what to do with them, nor did I know what it was called.  She simply used a sharp knife to cut away it's thick skin and then sliced a piece, sprinkled some salt on it and handed it over to me to eat.  Wow, it was juicy and crisp!

KohlrabiFritter.jpg

Kohlrabi can be eaten raw or cooked.  This was supposed to be a fritter dish that flopped "in the making of".  It turned out to be more of an omelette instead.  It's a mistake but a good one to be discovered!

Kolhrabi Nori Omelette

INGREDIENTS

• 1 small kohlrabi, matchstick slices
• 1/2 cup shredded nori
• 1 egg
• 2 tablespoon panko
• pinch of salt
• pinch of white pepper

INSTRUCTIONS

In a medium size mixing bowl, add your kohlrabi, egg, panko bread crumbs and the nori. 

Sprinkle a touch of salt and white pepper and whisk to combine all ingredients.

Pour mixture into a skillet and cook until the egg turns golden brown. 

Slide it onto a plate and serve. 

NOTE

I cut mine up into squares so that they were little bite size pieces.  They are great as kids snacks and appetizers.

Watercress Salad and Cilantro Dressing

A colorful diet is a healthful diet.  Orignally I was looking for jicama to add to this salad.  It was supposed to be a jicama watercress salad with mango slices except that I couldn't find it nearby.  My brain still thinks we are in San Diego but being back in Paris, this meant I'd have to find a specialty Mexican store (not near me).  Popular in Mexican cuisine, jicama has also spread to find itself cultivated in Asia.  Ding!  So off I went to my local Asian stores in search of jicama.  Well, I didn't quite find the jicama, nor was there a ripe mango ready for me, but I did wind up with a bunch of fresh nèfles (very similar to the loquats of Asia).  

Upon arriving at home I was greeted by Lady Jo and was handed a basket of organic veggies.  She was on duty call at her local organic co-op and got dibs on the veggies left behind.  Now, just so you know, I fully support the "No Veggies Left Behind" act and accepted the vegetables gracefully.  I eyed the big beetrootfor that would feed me for at least a weekand whipped out my mandoline to get working on it.  So this is how a dish begins to transforms itself, jicama replaced by beet root and mangos by nèfles.  Ooh, what else can I use on my mandoline since I have it out ahhh...yes, carrots... then a little bit of this, and a little bit of that...

Watercress Salad and Cilantro Dressing

INGREDIENTS//Serves 4-6

• 1 bunch watercress
• 2 carrots, julienned
• 1 medium beetroot, julienned
• 1 cup loquats (neflè), cut into bite-size pieces; mango is also a good substitution.
• Handful of sunflower seeds and linseeds (flaxseeds)

Dressing

• 1 bunch coriander (cilantro)
• 1 shallot
• 1/2 lime, juiced
• 1/2 inch of ginger, fresh and grated
• 1 clove garlic
• 1 Thai chili, cut a piece according to your spice level
• 1 1/2 tablespoon tamari sauce (or soy sauce)
• 1/2 teaspoon honey (optional)
• 2 tablespoons sesame oil
• 1 tablespoon vegetable or canonla oil

INSTRUCTIONS

Rinse the watercress and put it in your salad spinner.

Prepare a medium size bowl.  Separate and discard the stalks from the leaves, keeping just the thin, top bit of the stalks attached to the leaves.

With your mandoline, prepared your carrots and beetroot and set them aside.

Cut your fruit into bite size pieces.

Prepare your dressing by combing all the ingredients into a food processor.

Process until smooth.

In a salad bowl, add your watercress and pour in the dressing.

Toss together so that the watercress is drenched in the dressing, and then add in the rest of the ingredients.

Sprinkle some sunflower seeds and linseeds (flaxseeds) over your salad before serving.


Ratatouille Quesadilla

Ratatouille-quesadilla2.jpg

I just got back from San Diego, where I was paying a visit to meet my newborn niece, Sabine.  Unbiased of course, she is gorgeous.  Her nickname is "Bean" because that's what came out of her older sister's mouth when she was all of one year old trying to pronounce "Sabine".   Ever since she started out as a 'lil bean in her mama's belly, she's been referred to as "Bean".

Bean has that baby smell that I quickly got addicted to.  Every early morning, 6 a.m. to be precise, I would wake up and head to the kitchen: to find her, hold her, press my nose against her head and then inhale her baby scent.  If you are wondering why the kitchen, it's because my brother-in-law has started his day and mine (bless his heart) with a whole other scent, the coffee dropJapanese style drip.  He has his tools in order: grinder, scale, and drip filter,

This is how my mornings played out until I got over my jet lag: rise and shine at 6 a.m. soon became rise and snooze til 9 a.m.  Although I still had Bean's baby scent to look forward to, gone was the aroma of the other bean the coffee beanMy brother-in-law was long gone and off to work.

Besides sniffing Bean's head and drinking coffee from the drip, I did eat a lot of Mexican food.  Afterall, San Diego is just next door.  I thought I knew it all from my days milling about at Mexican family soccer games in some Brooklyn park, where I could eat freshly made tortillas and salsa off their portable, makeshift grills right out of the backs and trunks of their cars, and buy Tecate beers straight from their coolers, all for two dollars.  Apparently not.
 

Ratatouille-quesadilla.jpg

I discovered an ingredient called hominy that I'll have to search for in Paris.  Once I find it, I'm keen on making a fish based or vegetarian based pozole which I'll share with you in the future.  As for now, I have French Provençale ratatouille leftovers that I've converted into a Mexican quesadilla dish.  Olé!

Ratatouille Quesadilla

INGREDIENTS//Serves 4

•  1 x 400 gram tin of red kidney beans or other bean of preference
• 1 shallot, chopped
• 1 tablespoon cumin
• 1 teaspoon chili powder
• 150 grams of emmental cheese
• 2 cups ratatouille or any vegetable filling
• 1/2 bunch fresh coriander (cilantro)
• 2 large flour tortillas
• Dallop of sour cream or crème fraîche

INSTRUCTIONS

Add some cooking oil in a pan and cook the shallots over medium heat until they have softened. 

Add the tin of beans and stir.

Throw in your spices: cumin, chili powder.   Stir it up a bit.

Then transfer it to a small mixing bowl and mash it up with a fork or a masher.

Since I had ratatouille left over, you can choose any combination of vegetables; just cook it beforehand.   My kids love this with spinach, so I simply steam the spinach.

Lay out your tortilla and spread half of it with the bean mash, and the other half with your vegetable filling of choice.  Be careful not to add too much filling otherwise it will fall out.  Try to keep it thinly spread.  Sprinkle some coriander over the cheese.

Grab two to three handfuls of cheese and spread over the beans.

Place it on a large cooking pan over medium heat and cook until the bottom of the tortilla warms up and starts to speckle up golden brown.

Using a spatula, fold the quesadilla in half.  Press down on the quesadilla with the back side of the spatula and cook until the whole side is golden brown and then flip and repeat.

Transfer to a cutting board and cut them into wedges.

Serve along witha dallop of sour cream or crème fraîche (depending on which country you live in) and garnish with coriandre.


Steamed Pandan Cake

So this is what I've done with the pandan extract from last week's post, I have steamed a cake that has come out nice, spongy, and green with a taste of pandan.  Coconut is a popular match to this particular pandan flavor, so sprinkle some dried, shredded coconut over it toasted or not and have yourself a tea break.

.

Steamed Pandan Cake

INGREDIENTS

• 2 eggs
• 100 grams brown sugar
• 2 1/2 tablespoon coconut oil, unrefined (virgin)
• 1/2 cup almond milk (non-sweetened)
• 3 tablespoon pandan extract (home made)
• 1/4 teaspoon salt
• 2 teaspoon baking powder
• 1/2 teaspoon baking soda
• 200 grams flour

INSTRUCTIONS

In a medium size mixing bowl, combine your eggs, brown sugar, and coconut oil.  Mix together.

Add the rest of the ingredients.

Add the pandan extract in the almond milk, and keep mixing until everything is combined smoothly.

Sift the flour and then fold it into the mixture.

Pour the batter into individual cupcake molds, ramakans, or whatever mold you like that fits in your steamer basket and cover.   Place in a pot filled with an inch or two of boiling water making sure the bottom layer of the bamboo steamer basket doesn't touch the water.   Steam for 12 minutes or until you can slide a knife through the center to see if it comes out clean so that you know it's cooked through.

Let it cool.   Generously sprinkle some grated cococnut over it and serve.

Pandan Extract

Growing up, we used to take road trips with my family over the weekend.  We always drove through the city early Saturday mornings making a pit stop in Chinatown before heading onto one of the bridges or through the tunnels out of the city.  Our breakfast ritual was congee at a hole in the wall joint on Madison Street, then we would load up at the Chinese bakery on freshly made cha siu bao (BBQ pork buns) and swiss rolls for the rideboy, I loved those spongy cakes rolled up with the light, whipped cream filling.

PandanExtract-2.jpg

Those swiss rolls usually came in a yellow sponge cake or a green sponge cake option.  The pandan extract is what makes it green and what gives it its peculiar earthy and nutty taste.  It's often said that it's the " vanilla bean' of South East Asia, commonly used in pastries for not only coloring but for its aroma as well.  Pandan leaves are used in cooking too so that one can grill, fry, and steam their pandan wrapped fish and meats. 

You can buy pandan extract at the Asian stores but they usually contain some artificial coloring.  I like to go the natural route as much as possible...

...and after having one too many boxes of industrial packaged swiss rolls from our local Asian markets (thankful at least that there is the pandan option) over the past year, I decided to see if I could conjure up a piece of my childhood memory by squeezing out some fresh, green pandan extract to experiment in my next homemade adventure.


Pandan Extract

INGREDIENTS//Yields 1/3 cup extract (approx. 7 tablespoons)

• 9 Pandan leaves
• 1/2 cup water

INSTRUCTIONS

Rinse your pandan leaves in a big bowl.  Be sure to get out all the dirt and sand.

Using your kitchen shears, cut up your pandan leaves into 1/2 inch pieces.

Put it all in the blender, add some water.  Pulse,  stopping occasionally to swipe down the sides.  Repeat this process until you get a dark green, saturated liquid,  making sure all the leaves are finely pulverized.

Pour the pulverized pandan and its liquid into a strainer, and with the backside of a spoon press down on the leaves to extract the liquid.

Pour the liquid into a small glass jar and seal tightly.  This can be stored in the fridge up to a week.


Chickpea Sweet Corn Veggie Power Patty

When it comes to serving a veggie patty chez moi, I have to dress it up for my husband.  He's been raised a true carnivore and he's ambivalent towards words like "veggie patty".  It's not that he doesn't like his veggies, he does; he just doesn't need them to be meat replacements.  So no interpretations needed for a burger at ours.  I just serve him the whole veggie plate experience.  There's sustenance to these power patties and they go great on a salad and keep you nourished for hours.  

Veggie patties are wonderful since you can mix any veggies you want in it along with any spices, beans, grains, or tofu, and usually some breadcrumbs and nuts.  I played around and grounded whole oats to use as my binder.  This replaced the breadcrumbs.  This recipe is just one of many that you can conjure up in your own magic mixing bowl. 

Chickpea Sweet Corn Carrot Veggie Patty

BAKE TIME

Total bake time is 20 minutes at 200° C (390° F). 
10 minutes per side.

INGREDIENTS//yields 12 medium size patties or 16 small patties

• 3 cups chickpeas (2 x 400 gram tinned chickpeas)
• 2 teaspoon cumin
• 2 teaspoon paprika
• 3 clove garlic, minced
• 1/2 teaspoon chili powder
• 2 cups sweet corn (15 oz tin or 425 ml tin)
• 1 carrot, grated (optional)
• 50 grams of almonds, finely chopped
• 1/2 bunch of fresh flat parsley, finely chopped
• 1 shallot, chopped
• 100 grams of roasted kasha (buckwheat) groats, blended into crumbs
• 50 grams whole oats, blended into flour
• 200 grams feta cheese (optional)
• Salt (adjust according to taste)

PREPARATION

Blend your whole oats and almonds separately and put it in aside.
In a food processor, finely chop your parsley and shallot.  Lay it aside in small bowl.

INSTRUCTIONS

In a small size pan, heat up some cooking oil, and cook the grated carrots until softened.  Then set it aside to cool.

In a large mixing bowl add the chickpeas and mash by hand using a masher making sure no whole pieces are left.  Mash until soft but with some coarse texture left in it.

Mix in your spices: cumin, paprika, chili powder, garlic.

Add the sweet corn and the cooled cooked carrots.  Combine together.

Add the blended oats.

Crumble the feta cheese and add it into the mix (optional).

Stir in the almonds, shallots, and the parsley.

Add salt according to taste.

Scoop the mixture with wet hands to form your patties.

Using a basting brush, slightly brush the sides of the patty with olive oil.

Pre-heat your oven and line your baking tray with parchment paper.

Coat your patty lightly in the blended roasted kasha and place on the baking tray.

Put it in the oven and bake at 200°C for 20 minutes.


NOTE

I did have some dried herb called ache de montagne on hand so I crumpled some up for seasoning.  It happened to be one of those seasonal herbs added into an organic basket from the local farmers.  I did some research and it's called lovage in English.  It has an unsubtle taste, much like celery. 


Tzaziki


INGREDIENTS

• 1/2 English cucumber (long green ones), deseeded and grated (preferably organic so you can keep the skin on)
• 150 grams of Greek yogurt
• 1/4 clove garlic, crushed and minced
• 1 tablespoon olive oil
• 1/2 tablesoon lemon juice
•  1 tablespoon chives, diced
•  Salt (according to taste)

INSTRUCTIONS

If you are using an organic cucumber there is no need to peel it.  However, with a conventional cucumber I usually peel the skin off.  Halve the cucumber lengthwise.  Take a teaspoon and scrape out the seeds. 

Grate the cucumber using the large hole of a box grater.

Salt the deseeded and grated cucumber and let sit for 15 minutes so that the water comes out of it. 

Mix the garlic, olive oil and lemon juice into the yogurt.  Stir well. 

Squeeze the excess water out of the cucumbers using your hand or a cheesecloth and then add the cucumbers into the yogurt mix.

Add the chives and salt to taste.
 

Tarte aux Épinards

This is one of my first, self-impressed French dishes I have ever made.  I learned it from ma belle-mère—yep, my mother-in-law— that's how we address our mother-in-laws in France.  It can be so ironic for many, but I got lucky; I truly do have a belle-mère. 

The kids call her "Mamie Jacotte", an affectionate term rather than the literal translation, "grand-mère";  Jacotte is shortened from Jacqueline.  She's not only a fantastic belle-mère and grand-mère, but a wonderful cook.  I have picked up many of her tips and recipes in cooking and this is just one of many. 

Ma belle-mère makes simple and intricate dishes.  I usually opt for the former recipes.

Tarte aux Épinards

• 1 puff pastry
• 500 grams spinach, frozen or 700 grams of spinach, fresh
• 1 clove garlic, minced and sauté
• 4 eggs
• 4 heaping tablespoons crème fraîche
• 100 grams of emmental cheese
• a pinch of nutmeg
• Salt and pepper according to taste

INSTRUCTIONS//serves 4-6

Take your tart or quiche pan (around 10 inches in diameter, 1-1/2 to 2 inches deep or 25 cm in diameter, 4 cm deep) and roll out the puff pastry and place it into the pan.  Press the pastry into the sides of the pan. 

Use a fork to poke some holes into the bottom of the puff pastry to release any trapped air and to keep it from puffing up when baking. 

Once your oven is pre-heated at 190° C (375°F), place it in the oven to bake for around 10 minutes or until the puff pastry changes color to a golden brown.   This step is called blind baking; It partially cooks the pastry dough to prevent a soggy crust.  Check often during the duration of this time so that if you catch your pastry puffing up, just slide it out of the oven, take a fork to poke more holes and press the pastry back down into place, and place back into the oven.  Some people use ceramic beans or dried beans to keep the pastry from puffing up. 

Take it out of the oven and place the spinach filling inside.

Spinach Filling:

If you are using frozen spinach, cook it down on low heat until it thaws.  Drain out the excess liquid.  If you are using fresh spinach, begin with the the next step.

Sauté your garlic in a pan with a half tablespoon olive oil over medium heat. 

Then add your spinach and toss it around with the garlic.  Sauté for a couple of minutes and add some salt.  With fresh spinach, sauté and then cover the pan with a lid to let cook for 5-10 minutes or until wilted.  It should be a nice, saturated green.  With a pair of tongs, take out the cooked spinach and place it in a bowl and leave it aside to cool down.  Push down with the pair of tongs or a fork to get rid of excess liquid.

In a medium size mixing bowl, beat in 4 whole eggs.

Add your heaping dallops of crème fraîche and mix.

Stir in the emmental cheese.

Then a pinch of nutmeg, some salt and pepper according to taste.

Mix the spinach in with the egg, crème fraîche, cheese batter.  Stir until the spinach is evenly mixed in.

Pour this mixture into your blind baked puff pastry and place it in the oven for 40-45 minutes at 190° C (375° F).
 

NOTE

I have used both fresh and frozen spinach for this recipe.  It just depends on what I have in my fridge.  In France, I buy the frozen spinanch with their stems (épinards en branche).  If I use fresh spinach I trim the thicker part of the stems and keep an inch or two below the leaf.  You can also use 125 grams of yogurt to replace the crème fraîche. 

Les Chouquettes

Les chouquettes

Les chouquettes

I came home from the playground one day and put this on my list of things to make. I was intrigued and inspired by an acquaintance deemed a Papa Poule—an attentive, protective, and doting father— who had his child's doll and scooter in one hand, and a bag of his fresh, homemade chouquettes in the other.

I gathered my ingredients and was hit with an obstacle: I couldn't find sucre en grains or sucre perlé in any of the supermarkets nearby.  Obsessed as I can become, I ran to every grocery store and bakery in the area in search of these sugary, white pearls.  Returning home, ruffled by defeat, and saving this battle for another day in another arrondisement, I recounted my story in quest for these sugary, white pearls to Denis and Sandrine, our building's concierge and my neighbor.  Denis also happens to be a wonderful, certified baker and he gave me a few tips on how to make the chouquettes. He said he would pop by to check on how it was all coming along once I had found all my ingredients.  

Hours later, there was a knock on my door.  I swung the door wide open to find a bag of the sugary, white pearls dangling in front of me with Sandrine behind it.  Elle est trop chou!—She is such a darling!  She happened to be in the 2e and passed by G. Detou, the well-known bakery and cooking ingredients store, and picked me up a kilo of sucre perlé

Feeling like I just won the lottery, I ran down to tell Denis that I had a kilo of my sugary, white pearls.  Denis brought over his baker's toolbox, got right in the kitchen, and showed me how it's done.  Il est chou!—He's a darling!

Water, butter, and salt

Water, butter, and salt

Take the pot off the heat, add your flour, and with a spatula, vigorously beat it in until you get a dough paste balling up.

Take the pot off the heat, add your flour, and with a spatula, vigorously beat it in until you get a dough paste balling up.

Mix one egg in at a time

Mix one egg in at a time

Fill piping bag and squeeze silver dollar size dough drops.

Fill piping bag and squeeze silver dollar size dough drops.

Shake off the excess pearl sugar.

Shake off the excess pearl sugar.

190° Celcius for 20 minutes

190° Celcius for 20 minutes

Melt it down

Melt it down

Place the pot back on the heat and keep stirring until the paste of ball unsticks to the sides of the pot.  Shake the pot around so that the ball of dough paste rolls around in the pot unsticking itself from the sides of the pot.

Place the pot back on the heat and keep stirring until the paste of ball unsticks to the sides of the pot.  Shake the pot around so that the ball of dough paste rolls around in the pot unsticking itself from the sides of the pot.

Achieve a glossy dough paste

Achieve a glossy dough paste

Pour on the pearl sugar and shake the baking try up and over bringing it down the row.

Pour on the pearl sugar and shake the baking try up and over bringing it down the row.

Ready for the oven.

Ready for the oven.

Et voilà...golden chouquettes.  Lightly crispy on the outside.  Airy and moist on the inside.

Et voilà...golden chouquettes.  Lightly crispy on the outside.  Airy and moist on the inside.

Denis' Homemade Chouquettes

INGREDIENTS//Yields 80

•  500 ml of water
•  200 grams butter, unsalted
•  4 grams salt
•  300 grams flour (T45)
•  500 grams egg
•  300 grams pearl sugar (a.k.a. hail sugar and nib sugar)

INSTRUCTIONS

In a medium size pot, add your water, butter, and salt.  Bring it to a boil.

Take the pot off the heat, add your flour, and with a spatula, vigorously beat it in until you get a dough paste balling up.

Place the pot back on the heat and keep stirring until the paste of ball unsticks to the sides of the pot.  Shake the pot around so that the ball of dough paste rolls around in the pot unsticking itself from the sides of the pot.

Transfer the dough into a large inox mixing bowl.  Gradually beat in one egg at a time, and keep stirring until you get a glossy consistency.  If you scoop a bit of dough up with your clean finger, the dough should pull and fall back into place.

Pour pearl sugar along the top row of your choux pastry. Shake the tray up and down to toss the pearl sugar around so that it moves its way down to coat the choux pastry.

Denis used a 15mm tip for the pastry/piping bag.  Fill it half way with the dough, and squeeze out small rounds on a baking tray lined with parchment paper leaving an inch apart between them. 

Bake in oven at 190° Celcius (approx. 375° F) for twenty minutes.

NOTE

Using a piping bag looks easier than it is.  I kept getting pointy tips on the top of my choux/puff pastry.  Denis told me it was because I was lifting the piping bag after squeezing out the dough too quickly.  To get the choux/puff pastry nice and round at the top: squeeze out the dough, keep the tip in the dough, make an escargot figure, and then sweep off to the side.  This should give your choux a nice and rounded top.

I also ran across this article on French wheat flour explaining flour types.  I used T45 for this recipe which is regarded as a pastry flour.

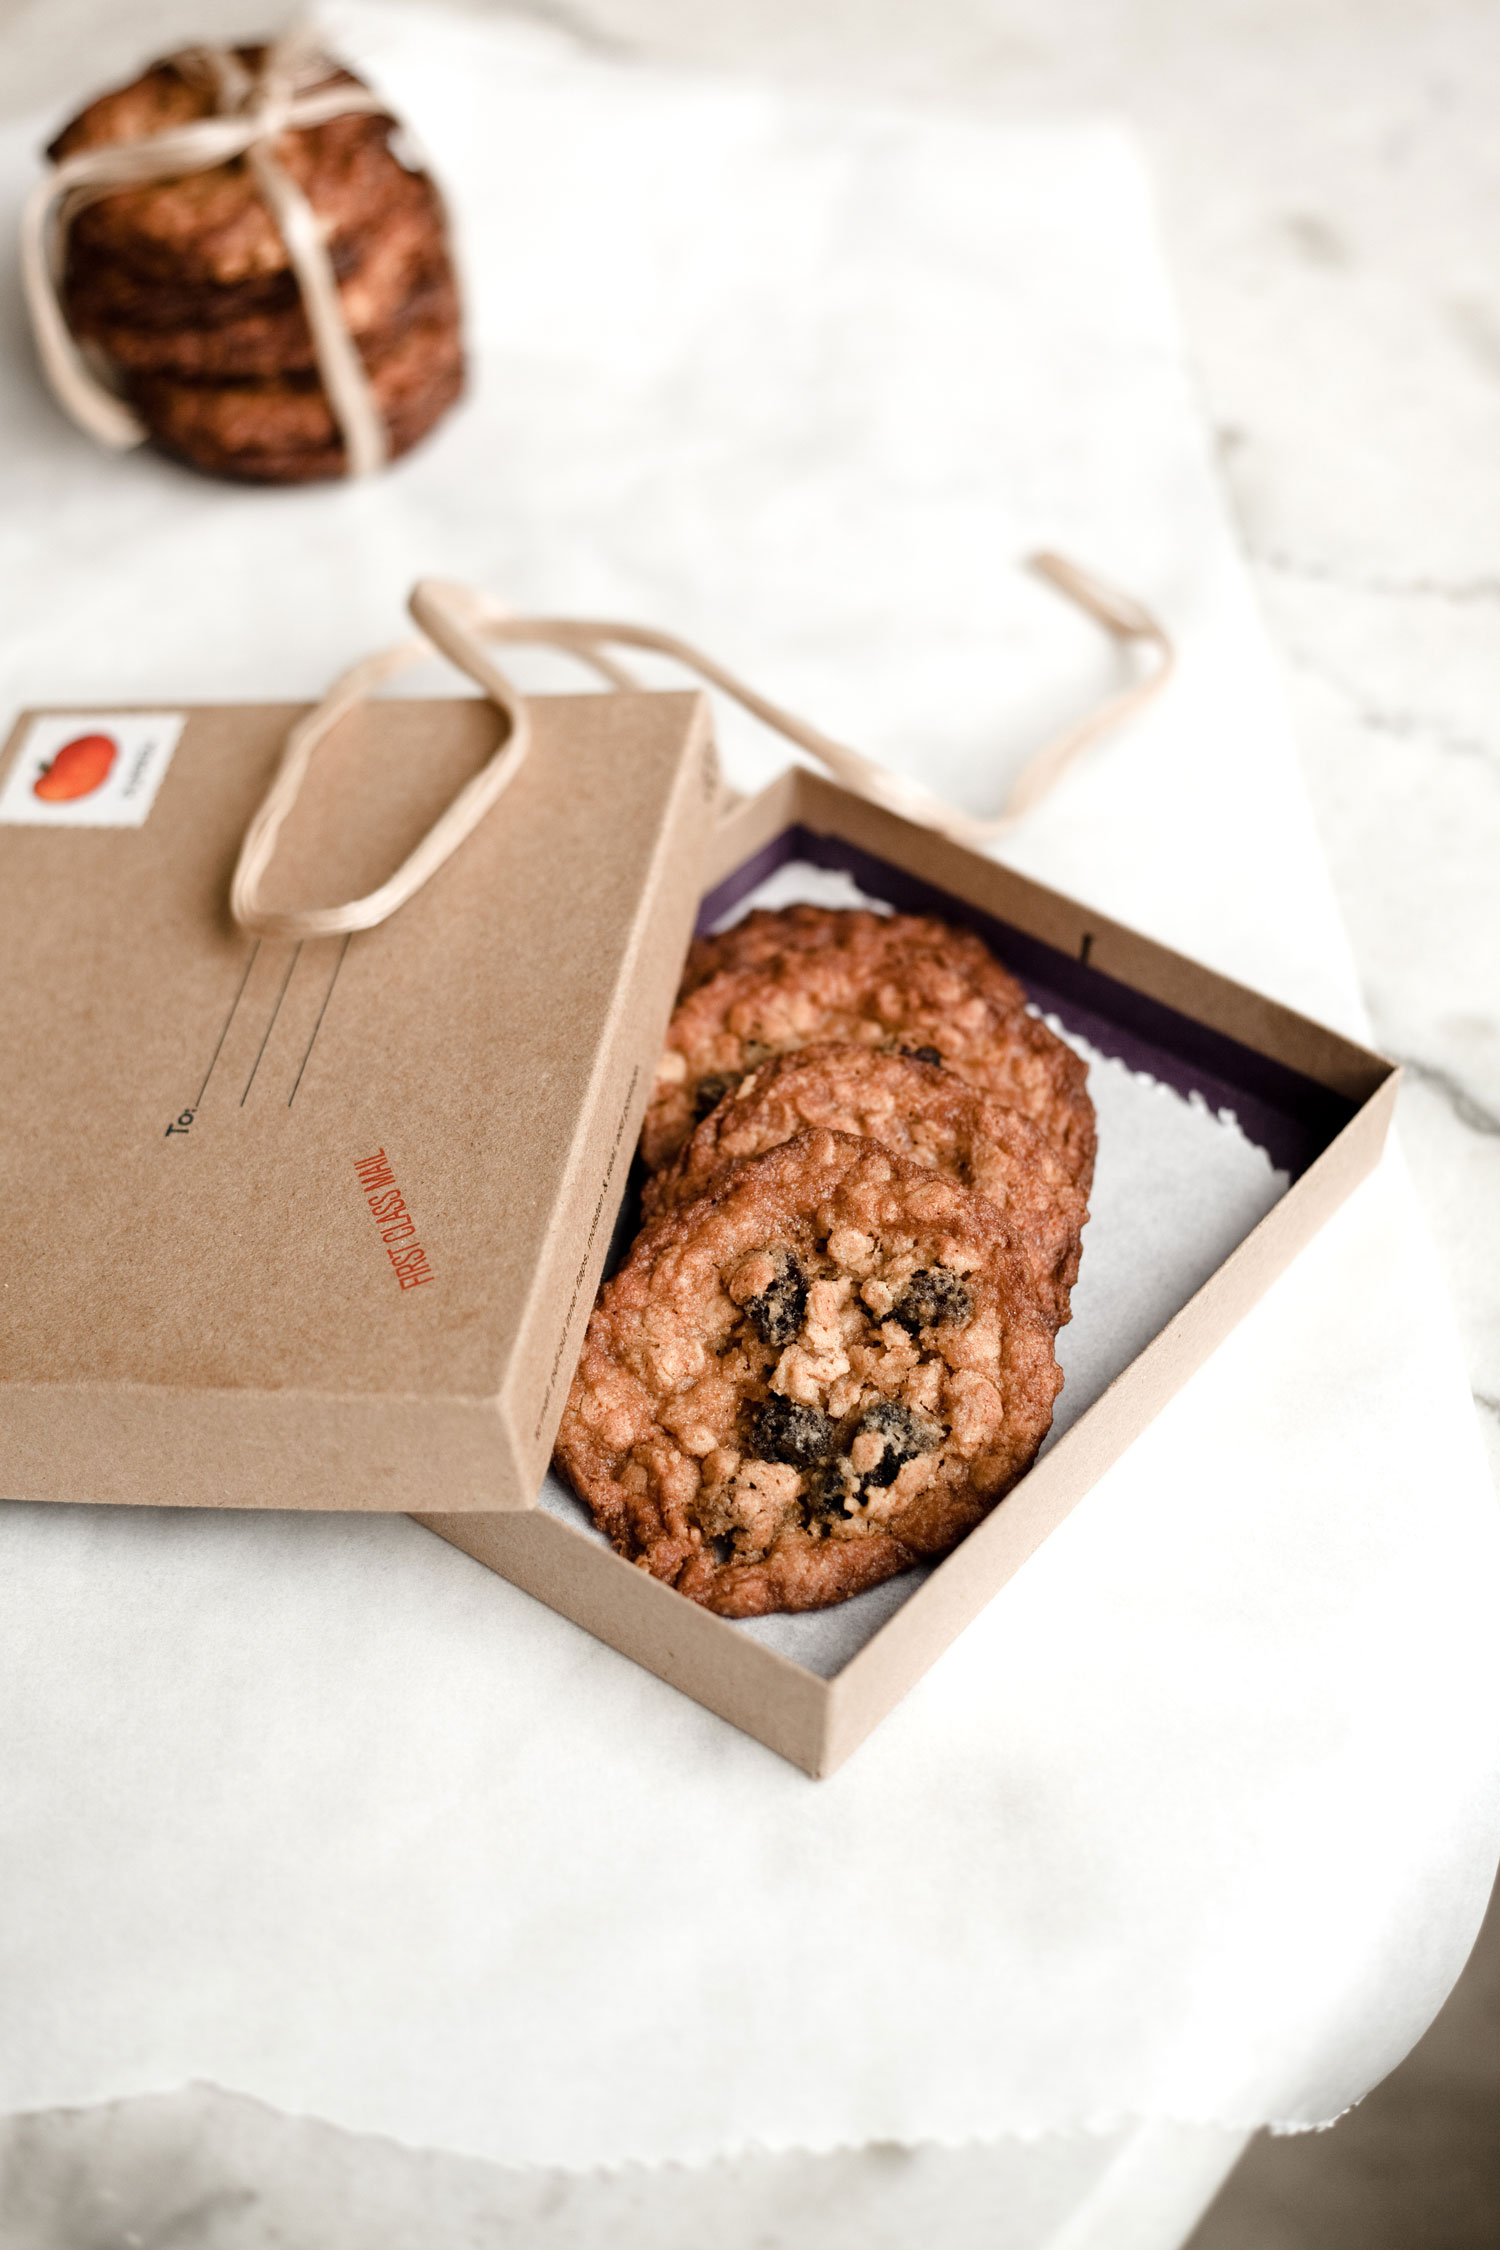
Gluten-Free Oatmeal Cookies

OatmealRaisinCookieGlutenFree.jpg

Fortunately, I don't have celiac disease, and I am not gluten intolerant, or anything of that sort; but I do like to experiment with different kinds of nutritional therapy and ingredients.  I choose a varied and moderate regimen when it comes to food, and since it seems impossible for my family to avoid glutttonous, glutinous treats, on occasion I try to make snack time gluten-free and homemade.  Le goûter in France takes place right around 4:30 p.m., when pre-school and primary school lets out, a.k.a. snack time and the witching hour—we all know what a pack of hungry wolves look like.   Usually you'll see the parents waiting around for their kids with a pack of biscuits, a fresh pain au chocolat straight from the bakery, or other viennoiserie in hand.   Traditionally, it would be a tartine: a slice of bread topped with confiture and butter or a piece of chocolate.  Oldies are goodies for sure—just the other day I saw a bakery offering mini brioches stuffed with a chocolate bar.  Trust me, I was tempted to reenact a childhood experience I missed out on.  It's on my radar for the next time.

Gluten-Free Oatmeal Cookies

INGREDIENTS//Yields 18

•  3/4 cup gluten-free all purpose flour (my mix: 1/2 cup rice & millet flour, 1/4 cup oat flour)
•  1 teaspoon baking powder
•  1/2 teaspoon cinnamon powder
•  1/2 teaspoon salt
•  1/2 cup packed brown sugar (2/3 cup if you prefer sweeter)
•  113 grams butter, softened (1/2 cup or 1 stick)
•  1 egg
•  1 1/2 cups oats
•  1/3 cup raisins (optional)
•  1/2 cup nuts, roughly chopped (optional- hazelnuts, walnuts, macadamia nuts)

INSTRUCTIONS

In a medium size mixing bowl combine the first six ingredients.

Add the softened butter and combine it with the ingredients.

Stir in the egg and mix until creamy.

Gradually stir in your oats: alternate between your oats, raisins, and nuts.

Pre-heat over to 190° Celcius (375° F).

Roll your dough into two inch balls.  Place it on your baking sheet leaving about two to three inches apart.

Bake for 8 minutes or until the edges have turned golden brown. 

Let it cool a little before removing from baking sheet.   Then let it cool down completely.

NOTE

Do not overbake your cookies otherwise they will be crunchy.  These cookies come out thin.  The dough spreads out in the oven.  Mine turn out crispy along the edges, sticky and chewy throughout the cookie. 


Spring Watercress Soup

Welcome spring, oh how I've been waiting for you to arrive.  I'm craving spring greens like watercress but somehow the salad route is not the way I want to go.  It's still pretty gray and cold these days in Paris so I think a warm detox soup is in order.  Watercress is apparently a powerhouse veggie, high in many nutirents especially vitamin K and vitamin A—good for the bones and the eyes, and a versatile vegetable that can be steamed, eaten raw as a salad, and liquidized into soup.

Watercress Soup (Soupe au Cresson)
 

INGREDIENTS//Serves 6

• 40 grams butter
• 1 medium onion, chopped
• 1 shallot, chopped
• 2 cloves garlic, crushed
• 4 potatoes (small to medium), rough chop
• 1.5 litres of vegetable stock
• 2 bunches watercress, rough chop


INSTRUCTIONS

In a large saucepan, heat up your butter and then toss in the onion, shallot, and garlic.  Sauté for about a minute or two.

Add the potatoes and sauté them all together until translucent.

Add 1.5 liters of vegetable broth to the ingredients, cover, and bring it to a boil.  Then lower the heat and simmer until the potatoes are soft.

Rinse the watercress clean.  Tear off about a half inch of the ends and rough chop the rest.

Add the watercress.  Cook for a few minutes or until the watercress has wilted.

Allow the soup to cool.  Using a hand blender, mix until smooth. 

Rewarm over low heat before serving.  Serve with a drizzle of olive oil or a dallop of crème fraîche with some toasted pine nuts.

NOTE

I never ate so much butter until I arrived in France.  It's just superior to the American one.  Simple as that.  No competition.  I use butter to sauté my alliums and potatoes in this recipe but you can choose your oil of preference.